
NWEC Mobile App
Fast, secure account access at your fingertips.
Download the app today
on the App Store or Google Play
Learn How to Make the Most of Your App
Step-by-step instructions for everything from making a payment to reporting an outage.
Setting Up/Managing Your Account
-
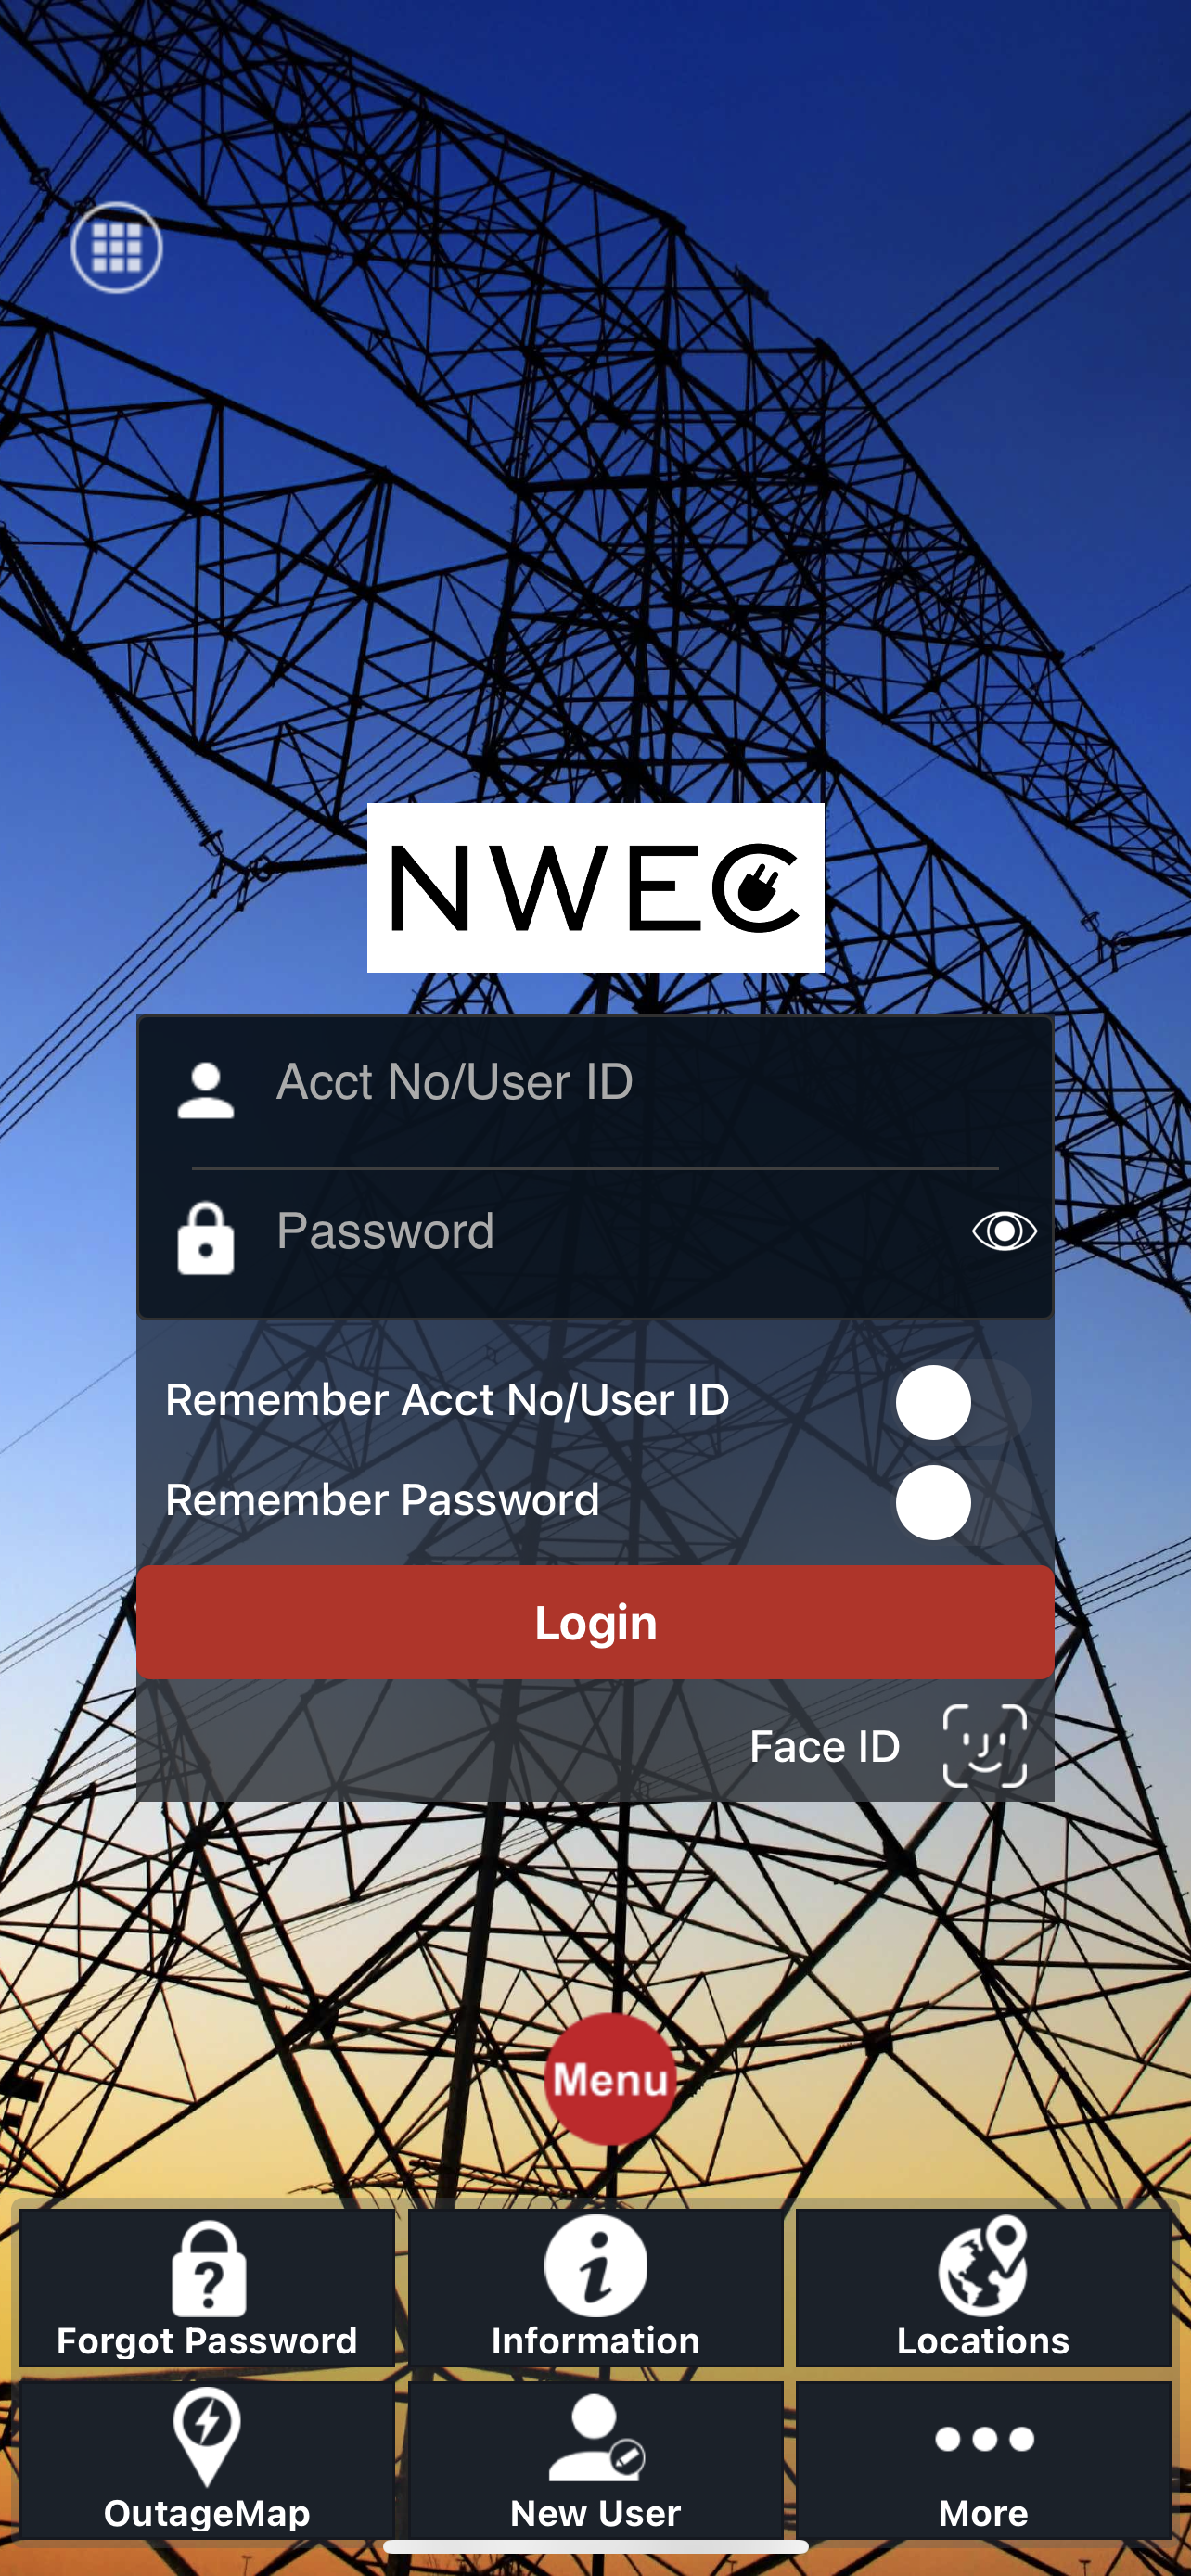
After downloading the app, the homepage you see should look like the image above. Tip: Be sure to click on the red “Menu” circle to see all your navigation options!
After clicking on “Menu” find the “New User” option and then fill out your information in each prompt to get setup!
-
After clicking on the red “menu” circle, choose “forgot password” and follow the prompts to create a new password for your account.
-
After logging in and clicking the red “menu” circle, you’ll be able to see these options: account list, account info, change password, create user ID, FaceID.
Account List Option - If you click here, you’ll be able to see all of the accounts listed under your name. You’ll be able to see if the balance for each account, whether the account is active, and can even choose to make a payment to one account, or all accounts. (more information about making payments can be found in the “making payments” drop down list on this webpage)
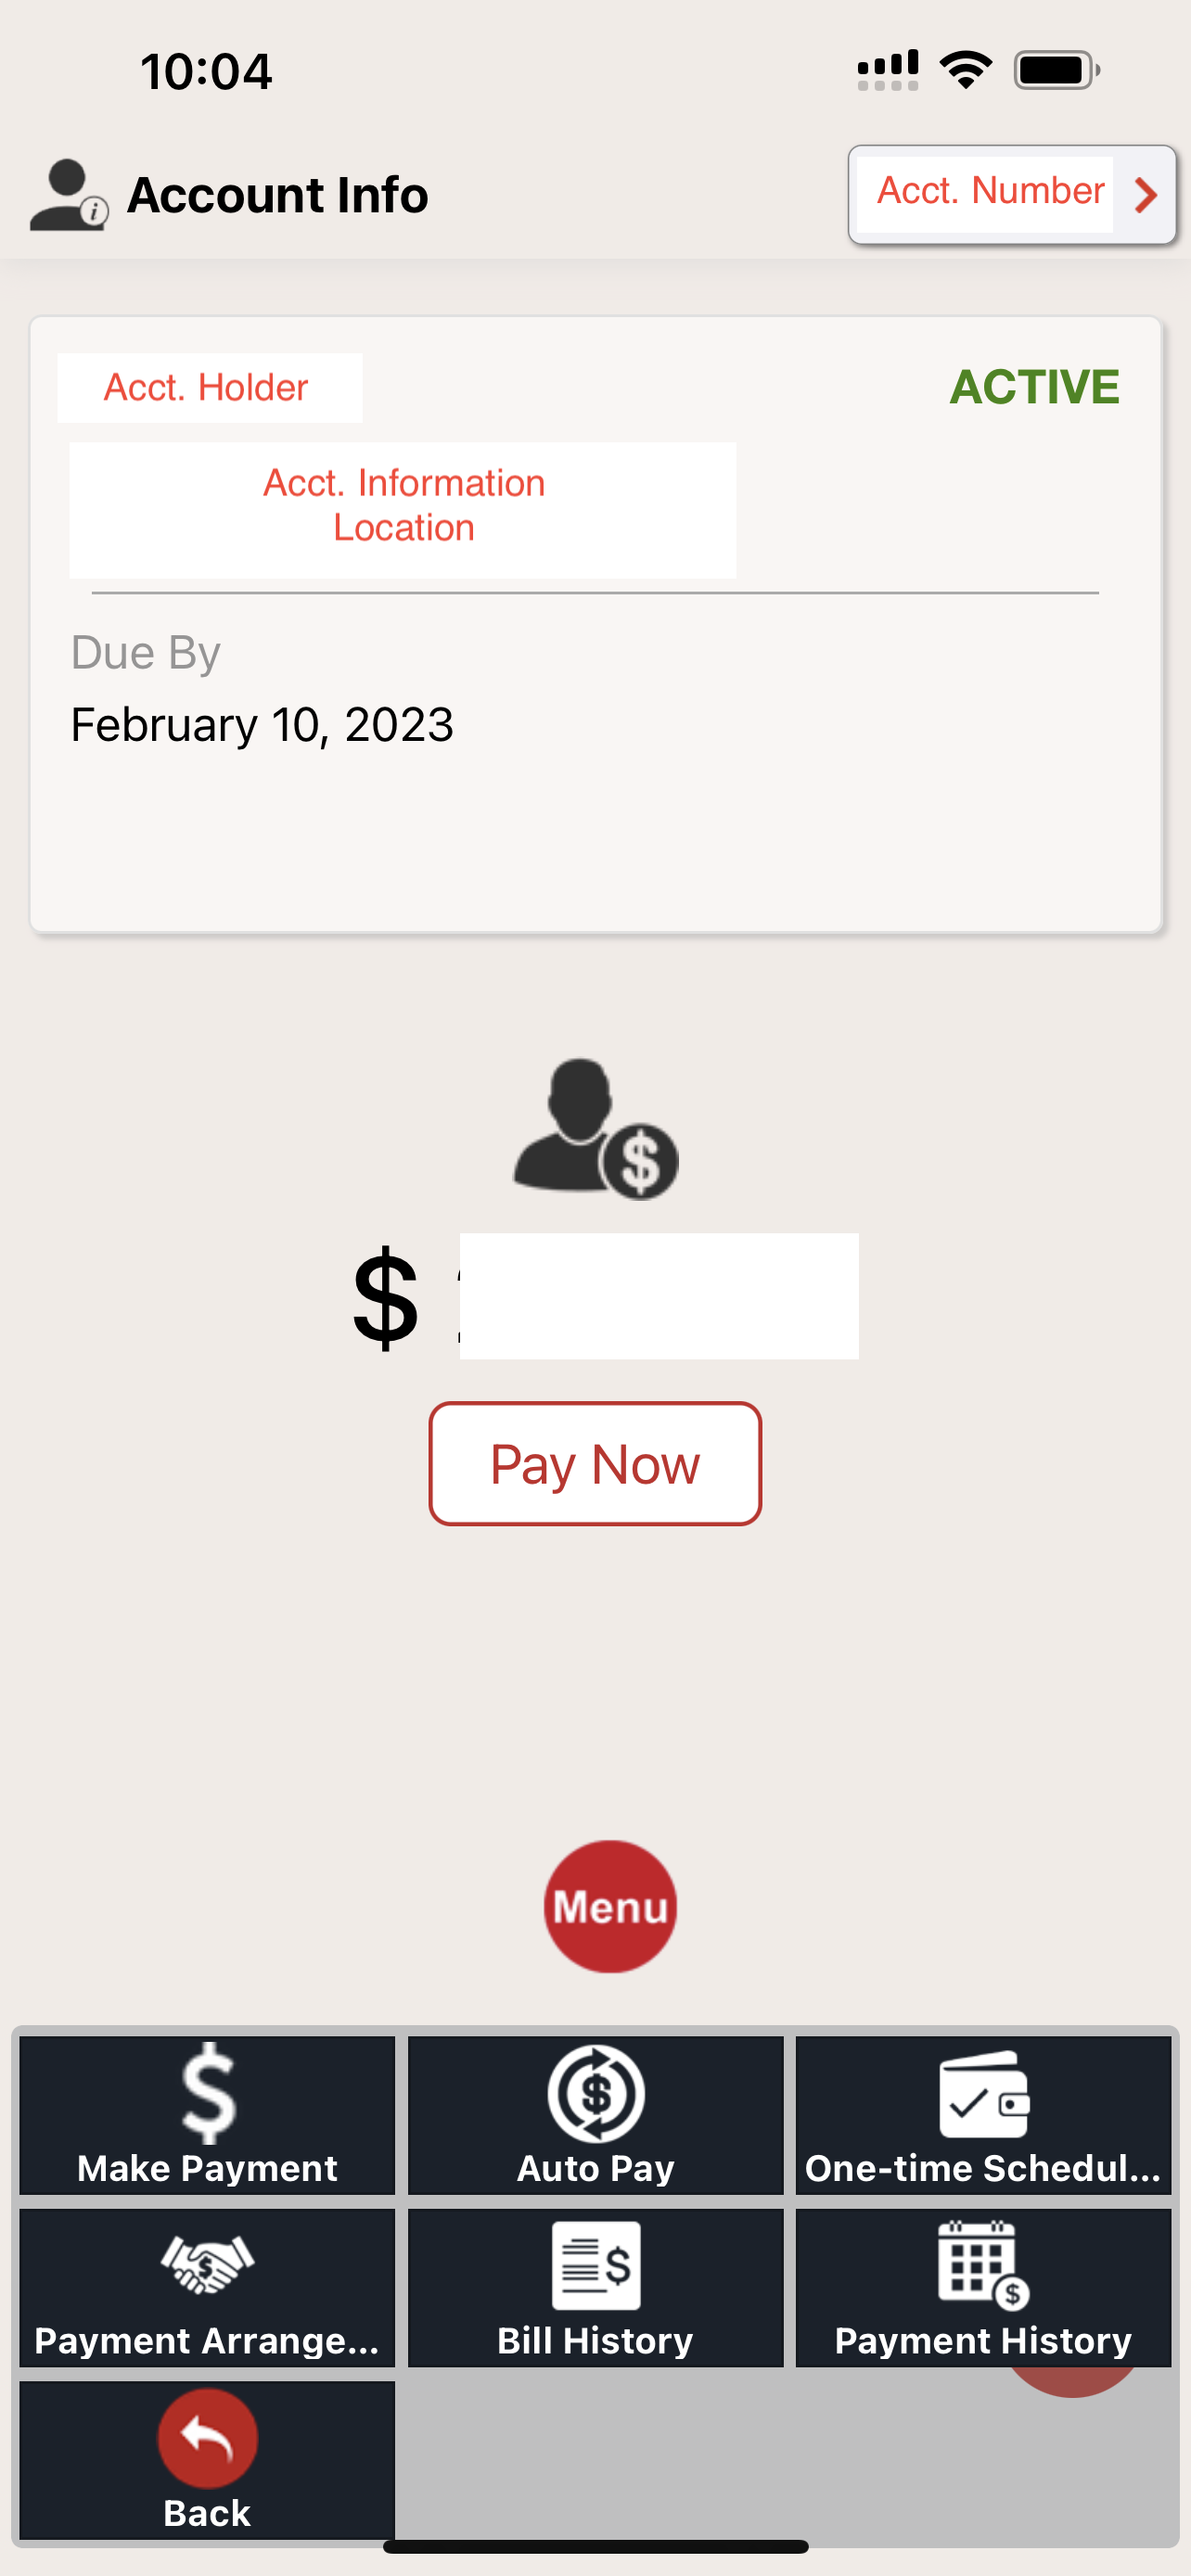
Account Info Option - This will show you the summary for each active account you have under your name.
Change Password Option - This will bring you to a page that will ask you to confirm your current password before creating a brand new one.
Create User ID Option - If you click here, it will allow you to change your User ID login name.
Face ID Option - This tab allows you to enable using Face ID to log into your account. Be careful, it also allows all of the faces saved on your device log in to your account as well.
Making Payments
-
This section applies to those who only have one account, AND to those who have numerous accounts under there name.
For those who have numerous accounts, after you log in you can click the red circle which has a person in the bottom right corner of the screen. This will give you the chance to see the balance for all accounts at once, and make a payment for all accounts if you choose. Clicking the checkmarks next to the account will allow you to select/de-select the accounts you would like to pay.
For those with numerous accounts, to make a payment for a single account you can choose the “my account” tab after logging in and clicking the red “menu” button. Then click the “account list” button to see all accounts under your name. Then, you can choose each individual account you wish and follow the instructions below.
After clicking the red “menu” button, then clicking “payments” you will be taken to another menu.
When you click “make a payment” you will have the option to choose the amount you pay, and your payment method. This only applies to the account number you have selected. The top right corner will show the account number you have selected.
-
After clicking the red “menu” button and the “payments” option, then you will see the “auto pay” menu.
After clicking here, you can choose the account(s) you’d like to pay, when you would like them to be drafted, and input your payment information.
For those with numerous accounts, you will need to make sure all account numbers you would like to be setup for auto pay are selected when completing this action.
-
After clicking the red “menu” button and the “payments” option, then you will see the “one time payment” menu.
You can then input the payment information you would like to use, and select the account(s) you would like to make the payment for.
A one time payment will not reoccur, so you will need to keep track of when your bill is due (10th) and when/how much you would like to pay.
-
After clicking the red “menu” button and the “payments” option, then you will see the “payment arrangement” menu.
Once you arrive on this page, you will only be able to select create, or cancel.
If you create an arrangement via the mobile app, the due date for the full balance for the account will be delayed for approximately one month. There are no additional arrangement options available online.
If you call our offices at 580-256-7425, then you will be able to discuss further arrangement options.
-
After clicking the red “menu” button and the “payments” option, then you will see the “bill history” menu.
Here, you will be taken to a page that shows your 12 most recent bills.
You can view the PDF file for the detailed bill by clicking on the small “PDF” icon to the left of the line item.
-
After clicking the red “menu” button and the “payments” option, then you will see the “payment history” menu.
Here, you will be taken to a page that shows the amount for every payment you have made to this account.
Monitoring Your Usage
-
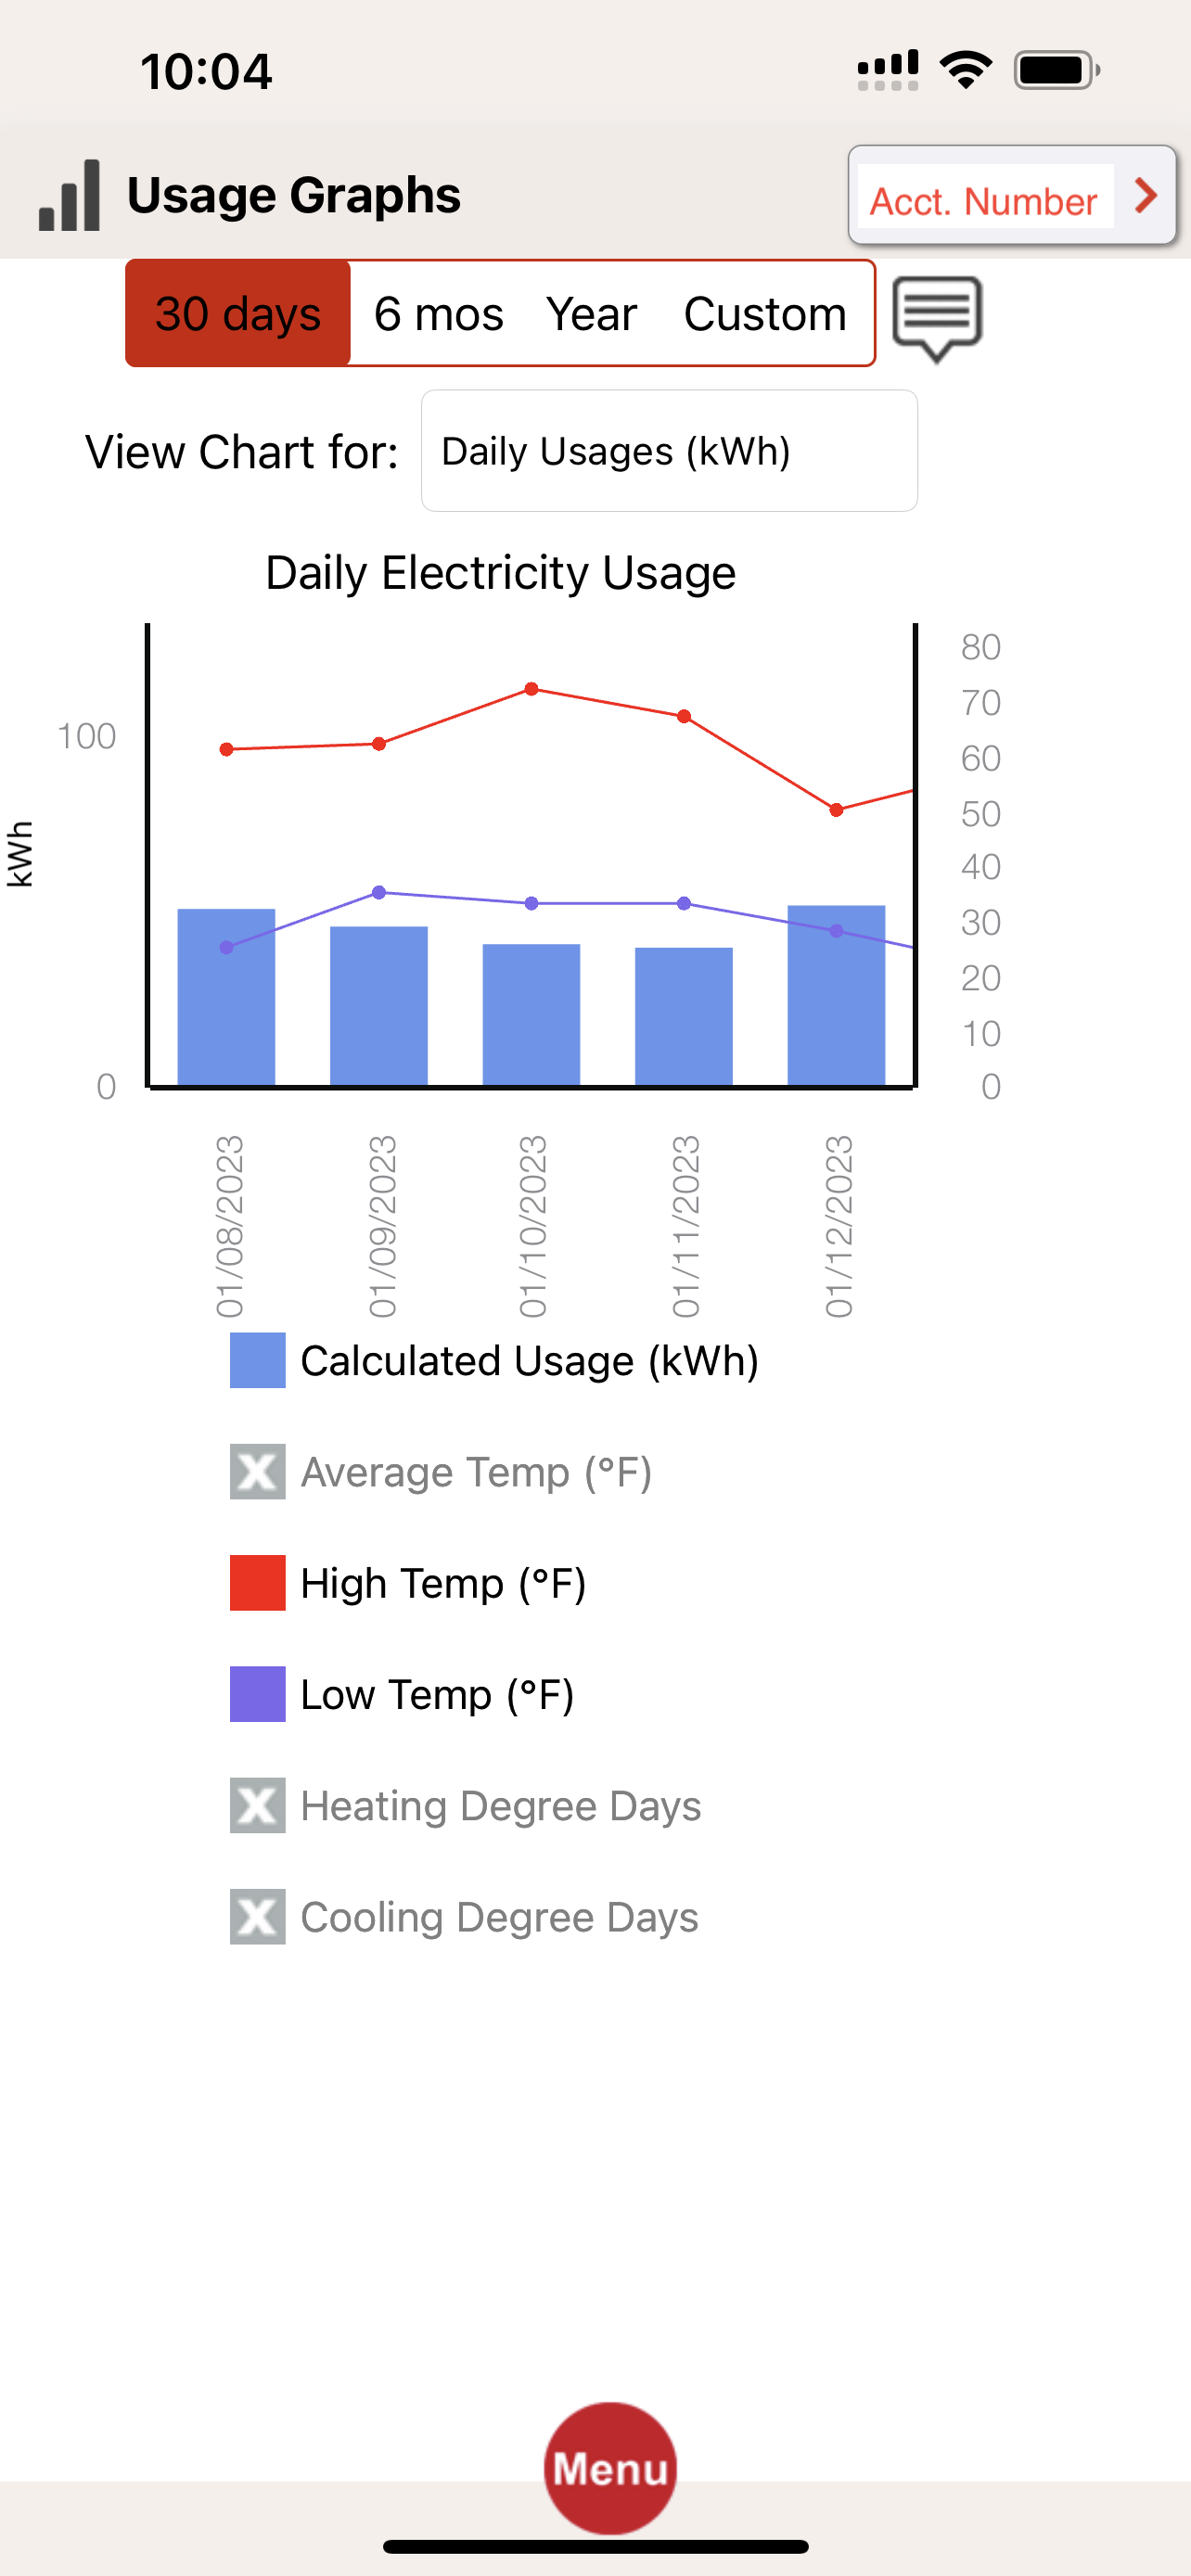
After logging in and clicking the red “menu” button, you will then need to click “my usage” and the “usage graphs” option.
Here, you can view your usage for each day in kwhs, or in daily cost for the specific account you are on. The default view is kwhs.
To learn more about navigating the usage graphs, you can click the “message bubble” right below your account number at the very top of the page to be taken through a quick tutorial.
You can click on the gray boxes below the graph to change the layers you see. For example, you can view your kwh use with the high temperature or low temperature to see your usage pattern in regard to the changes in the weather.
You can also change the timeframe you view the usage for. The default view is 30 days, but you can also choose “6 months”, a “year”, or set a “custom” range. This can be done near the top of the page by clicking the above mentioned names.

Managing Your Alerts
-
After logging in and clicking on the red “menu” circle, choose “my alerts” and “alerts” to be taken to the landing page.
Here, you can make sure you have the right contact information on file to send alerts to.
You can also turn on “voice alerts” by clicking the toggle button for your mobile or home number. Voice alerts are phone calls to the number chosen, rather than texts or emails. DO NOT click the button for mobile number or home number unless you do want to receive voice alerts.
To choose the alerts you would like to receive and to what device you would like to receive them, click the “manage alerts” button in the bottom lefthand corner.
-
After logging in and clicking on the red “menu” circle, choose “my alerts” then click “alerts” and “manage alerts.”
Here, you can click the gray circles to the right of the page to turn on notifications for each line item. You can either leave all spaces gray, or choose the way you would like to be alerted by leaving a checkmark under one or more of the icons.
The “letter” icon is for email alerts, the “message bell” icon is for push notifications, the “message bubble” icon is for text alerts, and the “megaphone” icon is for voice alerts.
If you make changes, don’t forget to hit “save” in the bottom right hand corner!
Only four options will appear at first, be sure to scroll down to see all options!
Reporting or Viewing Outages
-
After logging in and clicking the red “menu” button and the “outages” option, then you will see the “report an outage” menu.
To report your outage, put your phone number, click the “yes” bubble, add any comments that may help the linemen identify a trend such as “heard loud boom” if necessary, then click report an outage in the middle of the page.
-
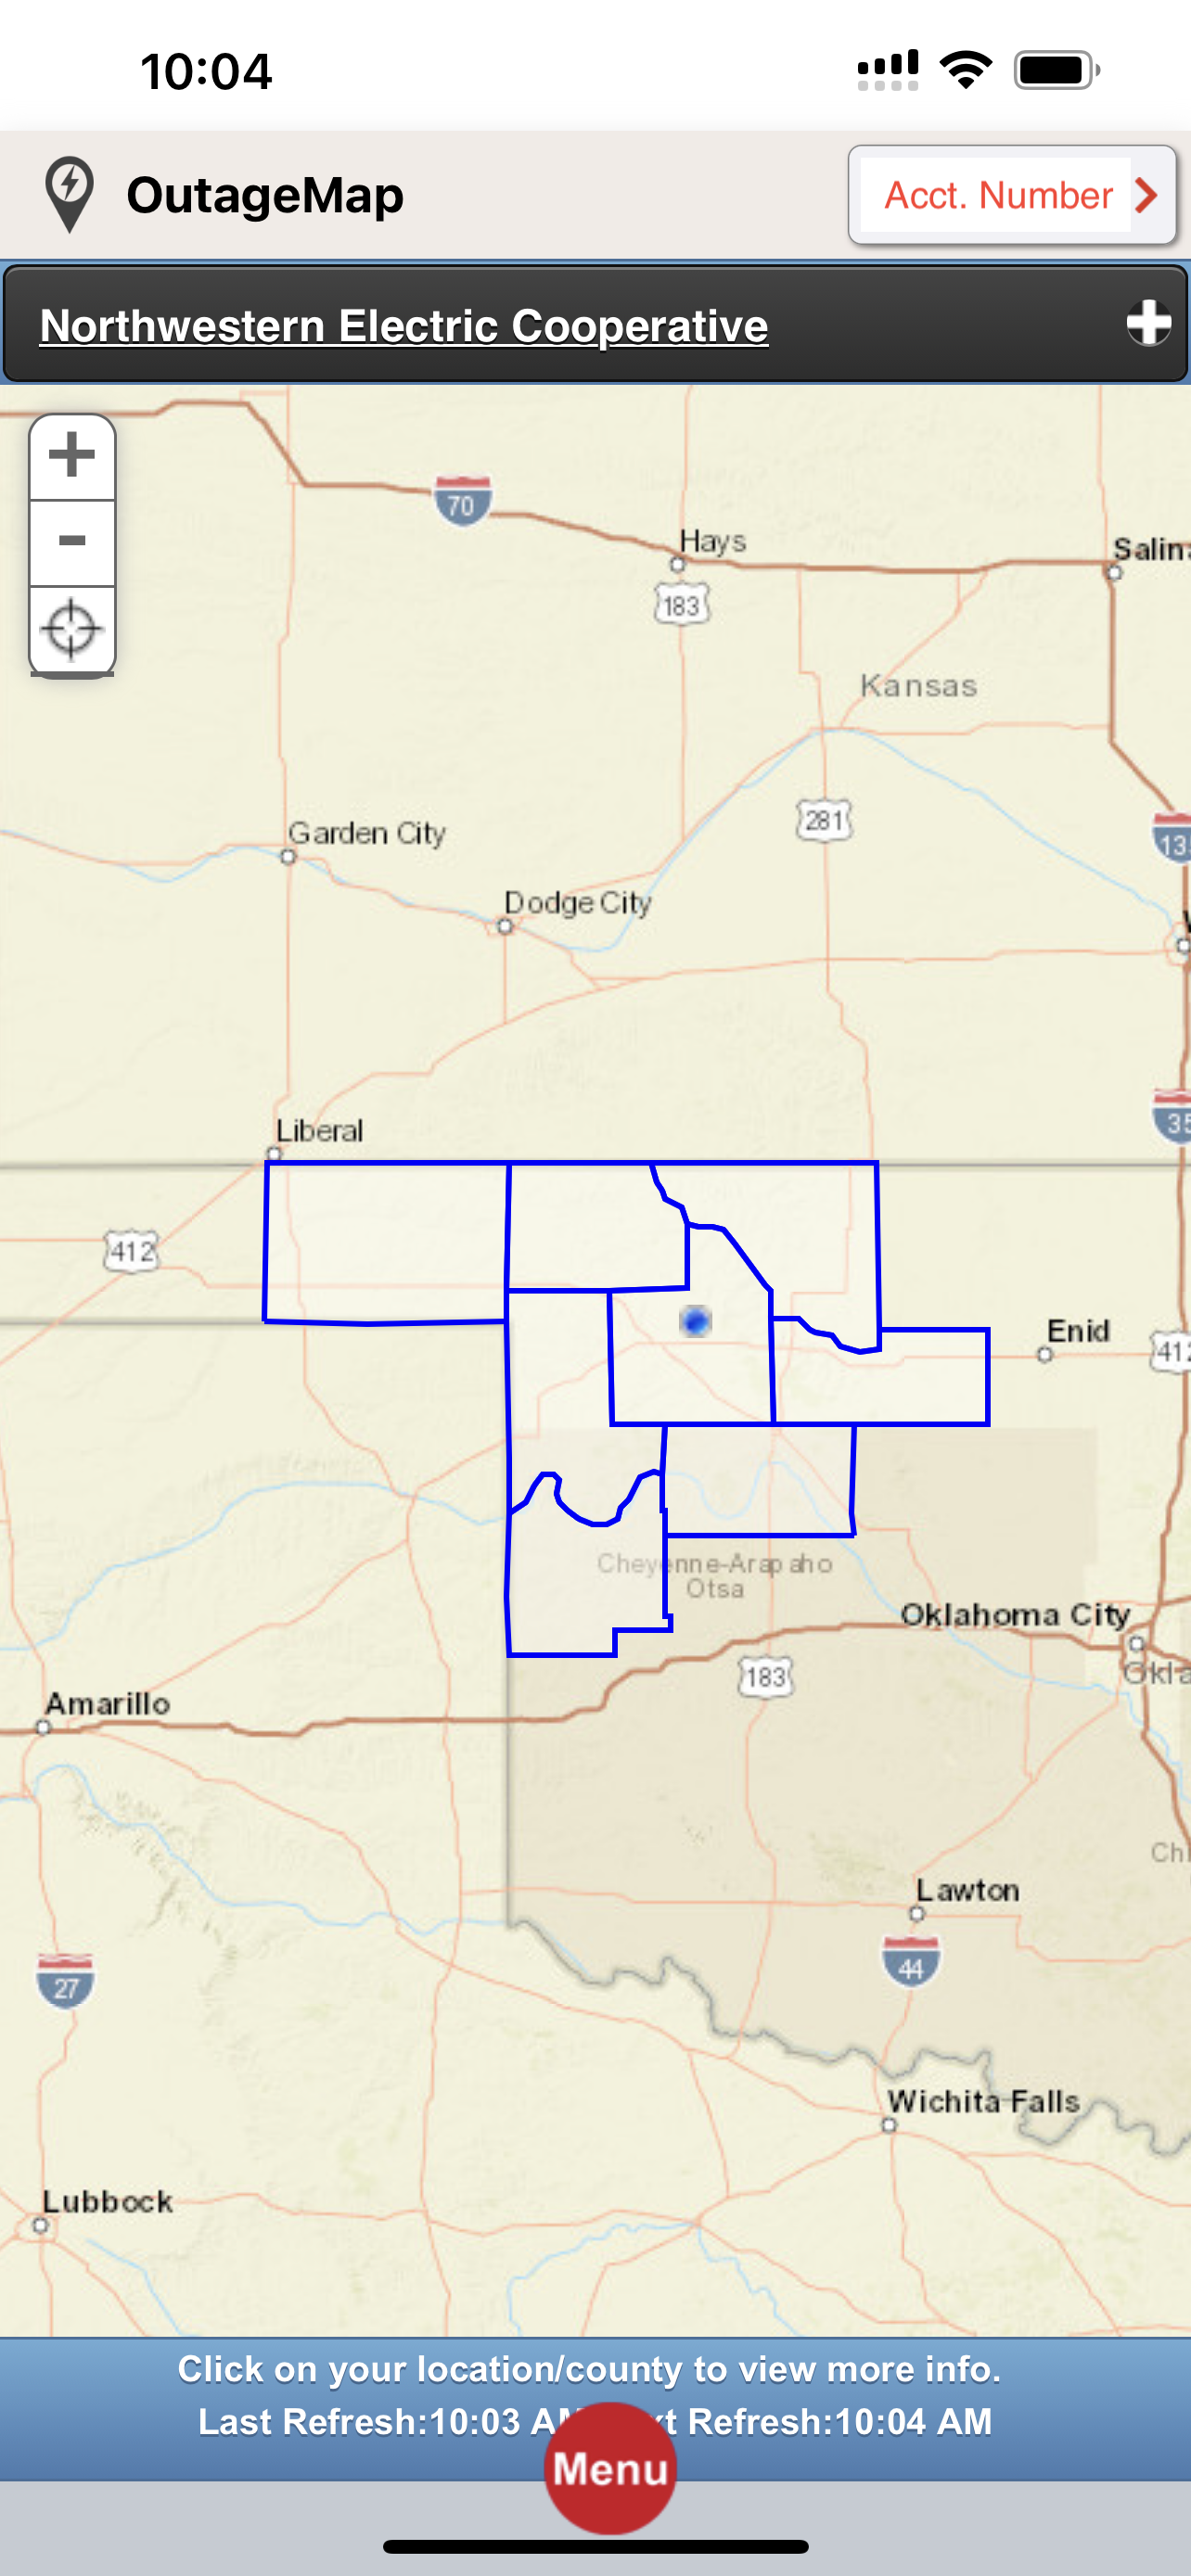
After logging in and clicking the red “menu” button and the “outages” option, then you will see the “outage map” menu.
After clicking here, you can view all active outages on NWEC’s system at that time.
Click on the county to see a summary of all outages in the area.
Click on the “plus sign” in the top right corner to either refresh the page, view a detail summary of all outages, or see the map legend to know what the colors of outage dots mean.
Contact the Co-op
-
After logging in and clicking the red “menu” button, click “contact us” and the “locations” option.
Here, you can view our office locations on a pinned map.
-
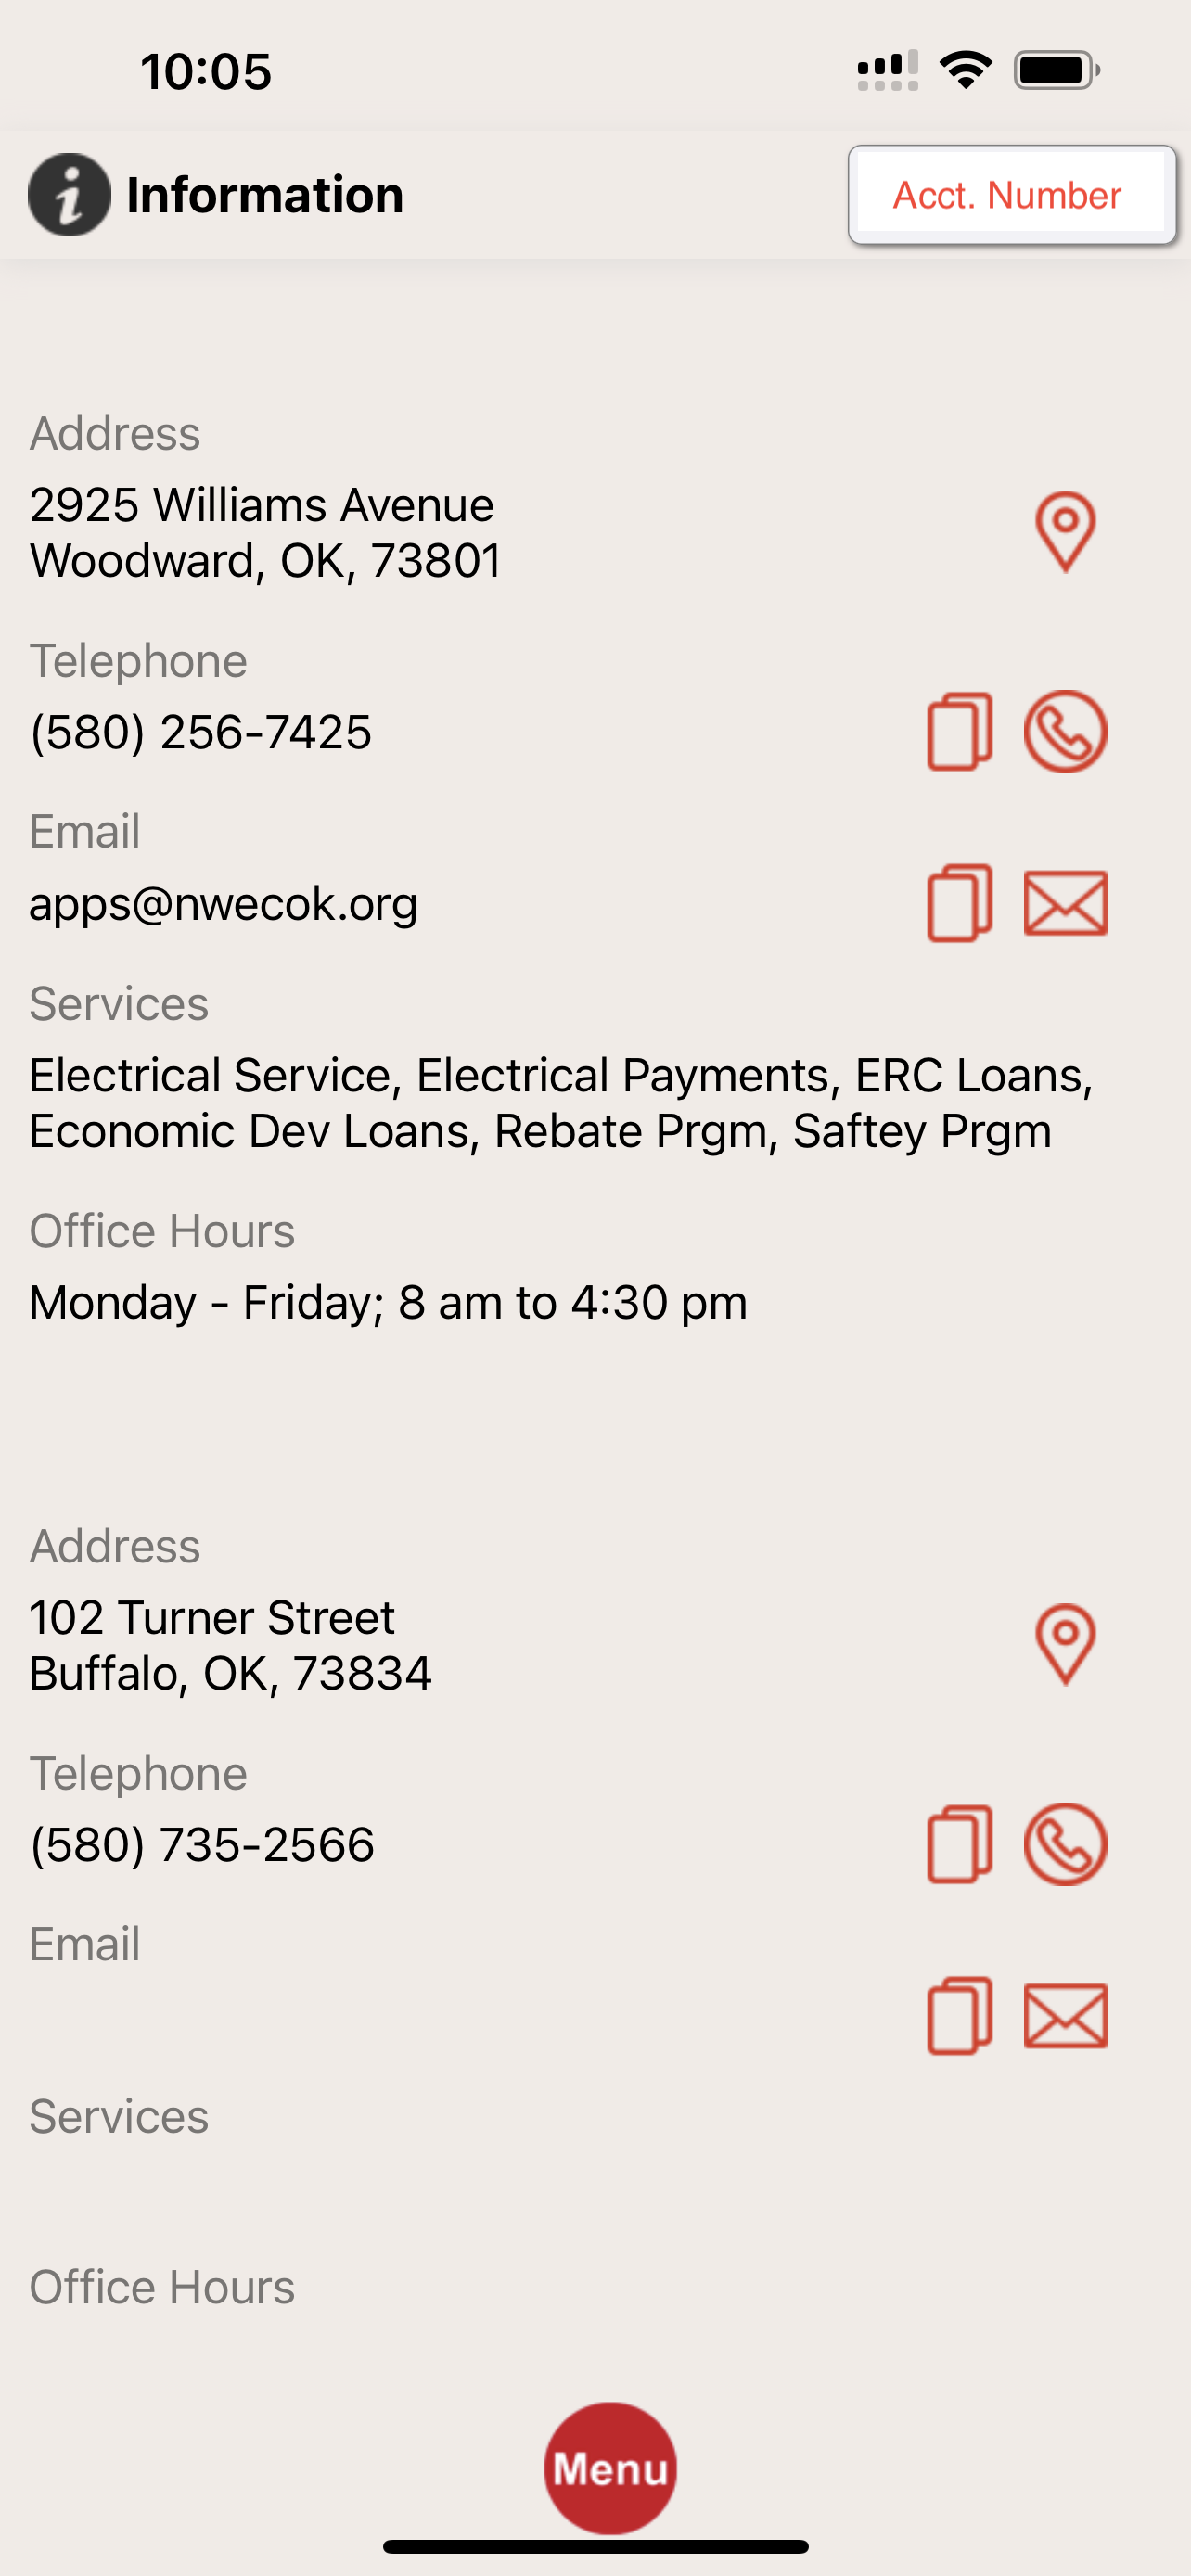
After logging in and clicking the red “menu” button, click “contact us” and the “information” option.
Here, you can see our office addresses, phone numbers, email and our office hours.